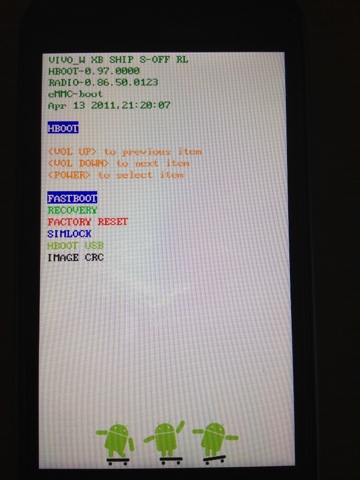


I. Setting Up The SDK
1. Download the Latest Android SDK from Google
Android SDK
2. Extract the Android SDK .Zip file to C:\AndroidSDK (this should name the new folder created
AndroidSDK in the C directory.
3. On your phone, click Settings > Applications > Development and make sure USB Debugging is on.
4. Plug your phone into your computer via USB cable (it needs to be on). It should say installing drivers
if using Windows.
!UPDATE 12.01.09 – If using Windows 7 skip steps 4 and 5 and use this procedure instead.
5. After it installs the drivers, goto the Start menu and type cmd into the search bar (Vista or higher) or
click Run then type in cmd (XP) to open the command prompt.
6. Type the following into the command prompt window (hitting enter at the end of every line):
cd\
cd AndroidSDK\tools\
adb devices
You should see a serial number pop up, it’s the serial number of your phone. This means you are all set.
If you do NOT see a serial number, then we need to reinstall the drivers.
II. IF DRIVERS JUST WON’T AUTOMATICALLY INSTALL, DO IT
MANUALLY HERE
1. Download your phone’s driver’s below then goto your Device Manager on your computer, look for the
phone and click on it. Then click Properties > Update Driver > Browse > Let me pick > Computer >
Have Disk > Browse > Then select the driver you downloaded below:
Motorola Droid Drivers (unzip the file once you download it).
Motorola Milestone Drivers (follow the instructions on the page).
Motorola CLIQ Drivers (follow the instructions on the page).
Nexus One Drivers (unzip the file once you download it).
Samsung Behold 2 Drivers (unzip the file, run the setup.exe) (If you have Windows 64Bit, you
CANNOT install the Behold Drivers. Find someone with a 32Bit system to to any Behold 2 procedures
involving ADB).
Samsung Galaxy Drivers (unzip the file, do NOT run setup.exe. Instead follow step 1 in Section II and
install manually.)
Samsung Galaxy Fastboot Drivers (unzip the file, then when you plug the phone in via fastboot mode,
select to install drivers manually and choose the folder you just unzipped and it should install them from
there).
III. (Optional) Reinstall Drivers (If they did not install properly in Section I or II)
1. Download USBDeview
USBDeview
2. While the phone is still plugged in, open USBDeview and sort by manufacturer. Find all the HTC
drivers and delete them all.
3. Once all have been deleted, unplug the phone from the USB cable and plug it back in.
4. The correct drivers should reinstall automatically (check the drivers as they are installing, one should
say ADB Device driver).
5. To check, goto Devices (or Device Manager for older versions of Windows) in your Start menu then
click on the “Android Phone”. Click on the Hardware tab, and check the list of drivers for ADB Interface
under Type.
IV. Some Common ADB/Fastboot Commands
ADB Commands
adb devices – lists which devices are currently attached to your computer
adb install
adb remount – Remounts your system in write mode – this lets you alter system files on your phone
using ADB
adb push
adb pull
adb logcat – starts dumping debugging information from your handset to the console – useful for
debugging your apps
adb shell
or lets you run commands directly
Fastboot Commands
fastboot devices – lists which devices in fastboot mode are currently attached to your computer
fastboot boot
fastboot flash
How To: Create a Goldcard
I. Before You Begin
1. Some memory cards simply will not let you edit them in the way we are about to, so you may need to
do this procedure and if it doesn’t work, try a new memory card. 2GB Kingston SD card DOES work for
sure so up to you if you want to just buy one of those before beginning.
2. YOU WILL NEED AN SD ADAPTER! This can be a MicroSD to USB that allows you to plug the
SD card into your computer’s USB port OR a MicroSD to SD adapter if you have a SD port on your
computer.
II. Setup ADB
1. Follow these instructions (with video) to setup ADB for your phone, then come back to this procedure
to continue.
How To Setup ADB
III. Create a Goldcard
1. Put the memory card you want to use for the GoldCard into your phone.
2. With the memory card in your phone, click on Settings, SD and Phone storage, then click Unmount
SD card. Once it unmounts, click Format SD card. (Please keep in mind that some memory cards don’t
work, and this will erase all data on your SD Card so back all the data up first to your computer)
3. On the Phone, goto Settings, Applications, Development and then make sure USB Debugging is
checked.
4. *Make sure you have installed the SDK and Fastboot correctly from Section I!!!
Plug the phone into the computer and then open the Command Prompt (goto the start menu and type in
cmd in the search box). Then type the following with hitting enter at the end of each line.
cd\
cd\AndroidSDK\tools\
adb devices
(wait for it to show a serial number underneath, if it doesn’t then reinstall the drivers from section I).
Then type:
adb shell
cat /sys/class/mmc_host/mmc1/mmc1:*/cid
5. A code will display, write the code down (MAKE SURE TO WRITE IT DOWN EXACTLY!)
6. Goto this site, http://hexrev.soaa.me/, (thanks to Soaa for the reverser!) then put in your code you just
wrote down into the text box and click submit. It will generate the code reversed and replace the first two
digits with zeros automatically. Write that down and continue.
7. Now, on your computer, goto http://psas.revskills.de/?q=goldcard and enter your email in the
appropriate field and for CID enter the reversed CID you just copied down BUT REPLACE THE FIRST
2 DIGITS WITH 2 ZEROS! (i.e. 12345678910 becomes 00345678910). *Thanks to Viper for providing
these Goldcards for FREE!
8. Click continue and then you will receive your goldcard.img via email. Once it arrives save it to your
computer.
9. Now, goto http://download.cnet.com/HxD-Hex-Editor/3000-2352-10891068.html?part=dl-
HxDHexEdi&subj=uo&tag=button to download the HxD Hex Editor. Save it and install it to your
computer.
10. Take your SD card out of your phone and put it into the SD adapter it came with. Then put that into
your computer so it shows up on your computer as Removable Disk.
11. Open the Hex Editor (Run as Administrator if one Vista or Windows 7) and click on the Extra tab,
then click on Open Disk. Under Physical Disk select Removable Disk (your SD card you just put into
the computer). Make sure to UNcheck “Open as ReadOnly”. Click OK.
12. Goto the Extra tab again and click Open Disk Image. Open up the goldcard.img that you saved from
your email. You should now have two tabs, one is the SD card (Removable Disk) and the other is the
goldcard.img
Press OK when prompted for Sector Size 512 (Hard Disks/Floppy Disks).
13. Click on the Goldcard.img tab and click on the Edit tab and click Select All. Then click on the Edit
tab again and click Copy.
14. Click on the Removable Disk tab (Your SD Card) and select offset 00000000 to 00000170 then click
on the Edit tab and click Paste Write.
15. Click on File then click Save.
16. Close the Hex Editor.
17. Test what we’ve done:
Take out the memory card from the computer, then put it back in.
Try to open the memory card on the computer (Removable Disk), if it lets you, you are all set. IGf it
asks/tells you to reformat the card, then try steps 13 – 19 again. If it gives you the same error again, then
try a different memory card (Erlern said it didn’t work for him until he finally went and bought a
Kingston 2GB card, then it worked on that card).
18. You can now use this goldcard to root phones that were previously unrootable!
Reported Issues:
Issue: I get no such directory or file when I type:
cat /sys/class/mmc_host/mmc1/mmc1:*/cid
Solution: Try to type this instead (replace the 1’s after mmc with zeros):
cat /sys/class/mmc_host/mmc0/mmc0:*/cid
Damn…it was a very rush trip or going abroad ever!
It was 25th May that i ordered the flight ticket for tomorrow…(that’s that way what i used to do things done…what a bad habit). I succeed ordering the ticket at 4:30 and i fly ahead to the Immigration to confirm the date for departure.
And fortunately, i done these all things within 2 hours...the travel agency was also expert at it (including faxing, transferring the ticket fare…)
…Phew…at last!

I got up early at 5:30 and headed to the airport by Ubus. I got there around 8. I am an early bird…i checked in as the 2nd passenger…
And a small problem came here, the travel agency typed my name wrong!…damn it…but fortunately i met a good guy from the flight agency that he let me pass it!…thanks man
The flight toke off at 9:10.


by Air Macau.
It flied for 1:30hrs.
It was around 11: 30 when i arrived Macau.
It is Macau.


I headed to 皇朝大樓 by a Taxi. it cost me 65$ (Macau)
It takes about 5 mins from the airport to there.
at first, I lost finding that building. But i asked for 2 people then i saw it.

It was about 3 minutes there to get the thing done. Very fast! Impressive!
And i got a paper of Entrance Permit! Damn it … i spent a flight ticket of 7800$ and more to get this paper!
Ok….Great!…then….it is time to pain the town red!….let’s go!
In fact, i didn’t research much about Macau…so i still lost …

this must be a club or something…it’d be great if it was at night.
and my stomach is thundering…i saw Subway n entered in…they people talked english…
i ordered today’s special and costs me 21$(84NT$) and a soft drink 12$(48NT$)…expensive!
but one thing great is, the wifi is available free at there


then i check the map with my T1, and looked for places…
then walked out and looked around….

This hotel is big…?


here comes…
the man!
that hotel is cool
with 2 colors.
Wynn


still lost….
ta da!! Hummer!… damn it

that Hummer is for the VIP(s) from Suncity. (what if for me?)


more cars…Bentley, Benz…limos…


this is one of the Casino building.

i still lost…don’t know where to go… but i heard somewhere called 大三巴立牌.
Then i can’t stop asking the right answer to get there…
here came an aunt, and he pointed me how to go there by taking a bus…she also gave me some changes…how kind is she… XD


Casino and hotels everywhere….
i got there somewhere near to my goal…


it’s like 馬六甲…?

unfortunately i went to the opposite direction of it…and i was walking like a mile from where i came from…damn it!

it’s a lot of great expensive cars there, but it’s a pity that they don’t have much roads to drive… XD.

and i asked i man where is 大三巴 and told me that i was on the wrong direction…
then i went back from where i left.
I still lost on the way back to 馬六甲….
it was like 3 miles that i was walking…
At last, a saw i sign board from a corner of the road…damn happy there
i arrived there….

This used to stand for Macau…? i guess!
It’s located on a small 坡. looks amazing!
back view


i was really tired there…look at my face~


then…i went back to airport by Taxi. It was 6:30PM when i got there.


and departure at 8:10
arrived TW at 9:30
straight back to Taichung by bus.
It was 12 when i get home!
Really tired! The most walking trip ever!